If you’re like most homeowners, you’ve cussed at your HVAC system a time or two because it just seems so inconsistent. Maybe your living room feels perfectly cozy in the winter—but your nose is numb when you wake up in the morning. Or your kids complain about their room being sooooo hoooooot in July—but you’re walking around the rest of the house in a hoodie. Super frustrating, right? Fortunately, there’s a relatively quick solution: Simply adjust your HVAC dampers.
What is an HVAC Damper?
As you’re likely aware, each room of your home has at least one HVAC vent in the floor or ceiling. They’re usually covered by registers that have louvres you can adjust to control air flow. Many homeowners try to deal with their too-hot-too-cold situation by closing some registers. That’s an OK approach, but it’s not the most efficient way to balance airflow overall. Dampers are.

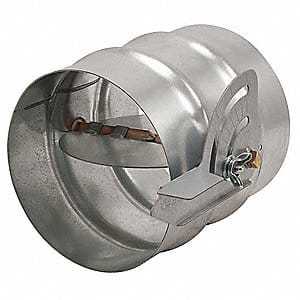
HVAC dampers, like this one, have an external lever that controls a metal plate inside the duct. By turning the lever, you rotate the plate, which allows more or less air to flow through that specific duct. Because dampers are located near your HVAC unit itself, rather than at the end of runs like registers are, they provide a more efficient way to redirect heated or cooled air to exactly where you want it.
Finding Your HVAC Dampers
Not all homes havedampers. If you have a premium HVAC system with “zoned heating and cooling,” your dampers are automatically controlled by your unit. (Score!) If you don’t have a premium system, that doesn’t necessarily mean you have them, though. Unfortunately, many new home builders opt out of installing dampers to save costs. (Boooooo!)
There’s no way to know without looking, so head to your furnace and first locate the main ducts leaving the unit. If you have dampers, you’ll find them on those runs, within a few feet of the unit itself. If you don’t have them, as Calgary HVAC experts, we’d be happy to talk about how to reconfigure your system to add them.
Adjusting Your HVAC Dampers
To properly adjust your HVAC dampers, follow these steps:
1. Turn your fan to the ON position: If you don’t have a fan setting, adjust your thermostat so the system runs constantly as you follow these steps.
2. Open every damper all the way: Usually, that means turning the lever so it’s pointed in the same direction as the duct.
3. Open every register in every room of your house: Now air is moving completely uninhibited through the entire system.
4. Determine which duct serves which rooms: From your main unit, follow each duct as far as you can before it disappears. This will give you a general idea of which rooms it serves. Then, close the damper on each duct—one at a time—and verify which rooms are affected. (You’ll be able to tell because even with the registers wide open, there will be little to no airflow.) When you’re certain where each duct leads, label it.
5. Make initial adjustments: Now that you know which duct serves which rooms, it’s time to start adjusting your dampers. Remember, when the damper lever is pointing the same direction as the duct, it’s completely open. The closer the lever is to being perpendicular with the duct, the less air flows through. Since we’re heading into cold weather season, let’s adjust your dampers to maximize your heat.
As you may recall from second grade science lessons, hot air rises. So, you’ll want to adjust your dampers to provide less airflow upstairs and more airflow downstairs—because the warm air will naturally rise. In the summer, you’ll want to do the opposite. (If you have a one-story home, simply adjust the dampers to provide more warm/cool air to the rooms you use most often.)Once you have your initial adjustments made, turn your system back to auto, and let it do its thing.
6. Monitor and adjust again: Allow your system to work for a couple of days, and then check the comfort level of each room. Adjust the dampers again if necessary, wait for a couple of days, and assess your progress. Rinse and repeat until every room feels comfy. We should mention this: Make small adjustments.
You know how when some people come home to a coolish house in the winter, they crank their thermostat to 87 degrees, thinking somehow it’ll warm up faster? (It won’t.) Don’t be that guy. And don’t completely close any of your dampers or you’ll be disappointed with the results. Make more, small adjustments and you’ll save yourself some frustration in the long run.
7. Label the damper position: When you have your system balanced to your maximum comfort level, mark the position of the damper right on the duct. That way, you won’t have to go through this whole experiment again next year.
8. When you switch from heat to air conditioning, adjust your dampers again: Don’t give in to the temptation to just set your dampers opposite from where they are in cold weather and call it good. You might find you prefer a particular duct mostly closed in both the summer and winter. So, go through your initial adjustments, monitor, and adjust again-as many times as it takes to make you happy. Then, mark your summer damper position right on the duct.
It takes a bit of patience and time to adjust your dampers, but it’s worth it in the long run to maximize your unit’s efficiency and feel comfortable in your home year round. And if adjusting your dampers doesn’t solve your heating and cooling inconsistencies, schedule a service call. You deserve a comfy home. We can help!


